Showing posts with label Surgery Steps. Show all posts


Large Bladder Calculus removed by Open cystolithotomy

Large Bladder Calculus removed by Open cystolithotomy

Cystolithotomy Surgical Steps

Preoperative Patient Preparation
  • Exclusion or treatment of a urinary tract infection
  • Perioperative antibiotic prophylaxis
  • Supine position with slight hyperextension of the lumbar spine
  • Disinfection and draping
  • Insert a transurethral catheter and fill the bladder with 200–300 ml

Surgical Technique
  • Lower midline incision or Pfannenstiel incision
  • Cut the linea alba
  • After blunt dissection of the retropubic space (cavum retzii), insert a wound retractor
  • Vertical cystostomy, which is secured with sutures to prevent further tearing
  • Remove bladder stones, foreign bodies or bladder tamponade, controll bleeding.
  • If necessary, perform simple prostatectomy
  • If needed, insert a suprapubic catheter
  • Close the bladder in two layers (mucosa – muscularis)
  • Drainage of retropubic space
  • Closure of the linea alba, skin closure

 Open Suprapubic Cystolithotomy Surgery Video


References 


Steps for Below Knee Amputation Surgery (Without Bone Bridge)

Following are the gross steps for doing a below knee amputation surgery, for detailed steps please check out these links ( Link1 and Link2 ) .

Marking the incision for flap using following parameters

  • Anterior incision 10cm distal to tibial tubercle
  • Anterior incision 2/3 total circumference
  • Posterior incision 1/3 total circumference
  • Posterior flap should be distal to the musculotendinous junction of the gastrocnemius
  • Round out the distal ends of the posterior skin flap to reduce redundancy of skin upon closure


Putting the Incision and Anterior Soft Tissue Dissection

  • Incision is deepened in layers
  • Saphenous vein is clamped and ligated;
  • Anterior incision is then carried through all tissues to bone
  • Now one can identify anterior tibial artery and veins, and deep peroneal nerve anterior to interosseous membrane; anterior neurovascular bundle can always be identified by spreading between the tibialis anterior and the EHL muscles
  • Incision is carried out thru lateral compartment, superficial peroneal nerve is identified, ligated proximally and cauterized


Transection of Fibula

  • Fibula is transected 1-2 cm proximal to the level of the tibial transection. Periosteum of the fibula is elevated proximally before transection


Tibial transection

  • Periosteal layer of the tibia is cut sharply 1 cm distal to the level of the skin and elevated proximally about 1-1.5 cm, leaving a layer for suture of the posterior musculature
  • Tibia is sectioned with power saw 1 cm distal to skin edge and anterior cortex is beveled obliquely


Posterior Flap Dissection

  • Posterior muscle mass is sharply and carefully freed from its attachments to the tibia and fibula distally to the level of the posterior skin incision
  • Posterior tibial artery & veins and the peroneal artery and veins are individually clamped and tied
  • Tibial nerve is pulled, cut proximally and allowed to retract
  • Deep muscles: tibialis posterior, FDL, FHL are transected just distal to the level of the tibia and allowed to retract;
  • Soleus muscle is isolated and excised, leaving the gastrocnemius as sole muscle of the myocutaneous flap
  • Sural nerve is pulled, cut proximally and allowed to retract


Myodesis

  • Drill holes just anterior to the bone bevel for myodesis
  • Use a locking style Krackow suture through the gastrocnemius aponeurosis and secure it to the tibia
  • Place a submuscular drain
  • Secure the borders of the gastrocnemius to the proximal anterior fascia


Final Steps

  • Wound is closed in layers
  • Soft dressing is applied
  • Cast is applied to immobilize the knee  to avoid a postoperative flexion contracture


Laparoscopic Appendectomy Steps


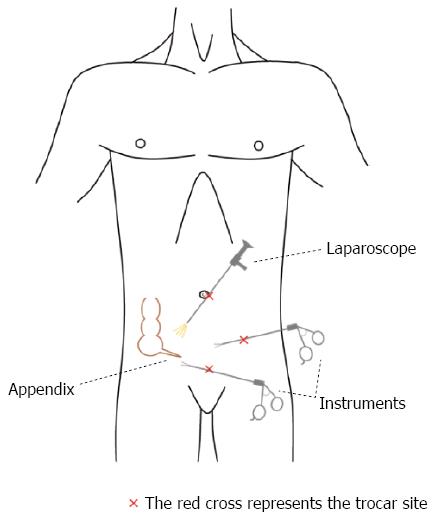
Step 1: Port placement: A 10-mm trocar is placed at the umbilicus, and the abdominal cavity is insufflated to a pressure of 15 mmHg. The camera is also inserted through this larger trocar.

A 5-mm trocar is placed at the suprapubis, and a second 5-mm trocar is placed at the LLQ.


Step 2: Inspect abdominal cavity: The area is inspected to orient the surgeon to the position of the appendix.


Step 3: Expose appendix: The bowel is gently retracted rostrally using atraumatic graspers to allow access to appendix.


Step 4: Locate and separate appendicular artery: The mesoappendix is separated from the body of the appendix, and the mesenteric fat is separated to reveal the appendicular artery. This is best done using the “spreader” action of a dissector.


Step 5: Divide appendix from cecum: Using an endoloop, two loops are placed proximal to the cecum, and a third loop is placed 1-2 cm distally to these. The appendix is then divided between the two proximal and 3rd distal loops using scissors or cautery.


Step 6: Extract appendix: The camera may be withdrawn and the existing 10 mm port used for extraction


Step 8: Irrigate: The abdominal cavity should be irrigated thoroughly with sterile saline and suctioned clean several times. In the event of a rupture, great care should be taken to ensure all pus or other infectious fluids have been removed.


Step 9: Final inspection: The abdominal and pelvic cavities are inspected one final time for any signs of infection, errors, or other potential complications.


Check out these related videos:


<Don't forget to like or share if you found this useful!>


Topics