
Note: Dr. Farhad M. Limonadi (neurosurgeon at Palm Springs, CA) removes two brain tumors from a patient with newly discovered metastatic brain tumors. Patient did well postoperatively and was discharged home. View through the high power magnification of surgical microscope.
Showing posts with label Surgery Videos. Show all posts
Showing posts with label Surgery Videos. Show all posts


Steps for Below Knee Amputation Surgery (Without Bone Bridge)
Following are the gross steps for doing a below knee amputation surgery, for detailed steps please check out these links ( Link1 and Link2 ) .Marking the incision for flap using following parameters
- Anterior incision 10cm distal to tibial tubercle
- Anterior incision 2/3 total circumference
- Posterior incision 1/3 total circumference
- Posterior flap should be distal to the musculotendinous junction of the gastrocnemius
- Round out the distal ends of the posterior skin flap to reduce redundancy of skin upon closure

Putting the Incision and Anterior Soft Tissue Dissection
- Incision is deepened in layers
- Saphenous vein is clamped and ligated;
- Anterior incision is then carried through all tissues to bone
- Now one can identify anterior tibial artery and veins, and deep peroneal nerve anterior to interosseous membrane; anterior neurovascular bundle can always be identified by spreading between the tibialis anterior and the EHL muscles
- Incision is carried out thru lateral compartment, superficial peroneal nerve is identified, ligated proximally and cauterized
Transection of Fibula
- Fibula is transected 1-2 cm proximal to the level of the tibial transection. Periosteum of the fibula is elevated proximally before transection
Tibial transection
- Periosteal layer of the tibia is cut sharply 1 cm distal to the level of the skin and elevated proximally about 1-1.5 cm, leaving a layer for suture of the posterior musculature
- Tibia is sectioned with power saw 1 cm distal to skin edge and anterior cortex is beveled obliquely
Posterior Flap Dissection
- Posterior muscle mass is sharply and carefully freed from its attachments to the tibia and fibula distally to the level of the posterior skin incision
- Posterior tibial artery & veins and the peroneal artery and veins are individually clamped and tied
- Tibial nerve is pulled, cut proximally and allowed to retract
- Deep muscles: tibialis posterior, FDL, FHL are transected just distal to the level of the tibia and allowed to retract;
- Soleus muscle is isolated and excised, leaving the gastrocnemius as sole muscle of the myocutaneous flap
- Sural nerve is pulled, cut proximally and allowed to retract
Myodesis
- Drill holes just anterior to the bone bevel for myodesis
- Use a locking style Krackow suture through the gastrocnemius aponeurosis and secure it to the tibia
- Place a submuscular drain
- Secure the borders of the gastrocnemius to the proximal anterior fascia
- Wound is closed in layers
- Soft dressing is applied
- Cast is applied to immobilize the knee to avoid a postoperative flexion contracture

Check out this splendid video on Anatomy in Diagnostic Laparoscopy WITH labels. It is an excellent video to get an orientation and understanding of laparoscopic anatomy of abdomen. This was shown at the ESGE Congress in Berlin.
Check out these related videos:
LAPAROSCOPIC CHOLECYSTECTOMY BY DR R. K. MISHRA
GROSS ANATOMY AND SEGMENTAL ANATOMY OF LIVER
LAPAROSCOPIC APPENDECTOMY BY DR ANDREW RENAUT
PRINCIPLES OF BOWEL ANASTOMOSIS WITH VIDEOS
<Don't forget to like or share if you found this useful!>

Laparoscopic Cholecystectomy Steps
- Prepare the patient
- Placement of first 10mm trocar (midline navel)
Below is a video showing the gross anatomy of liver. Also you will find two nice presentations covering gross and segmental anatomy of liver in depth. Questions related to the segmental anatomy of liver are very commonly asked in examinations.
This presentation explains segmental anatomy of liver very well.
All about Surgical Anatomy of Liver.

This presentation explains segmental anatomy of liver very well.
All about Surgical Anatomy of Liver.
Check out these related videos:
LAPAROSCOPIC CHOLECYSTECTOMY BY DR R. K. MISHRA
http://www.worldsurgeryforum.net/2018/02/laparoscopic-cholecystectomy-by-dr-mishra.htmlLAPAROSCOPIC APPENDECTOMY BY DR ANDREW RENAUT
PRINCIPLES OF BOWEL ANASTOMOSIS WITH VIDEOS
MOST IMPORTANT ANATOMY IN DIAGNOSTIC LAPAROSCOPY
<Don't forget to like or share if you found this useful!>

Laparoscopic Appendectomy Steps
Step 1: Port placement: A 10-mm trocar is placed at the umbilicus, and the abdominal cavity is insufflated to a pressure of 15 mmHg. The camera is also inserted through this larger trocar.
A 5-mm trocar is placed at the suprapubis, and a second 5-mm trocar is placed at the LLQ.
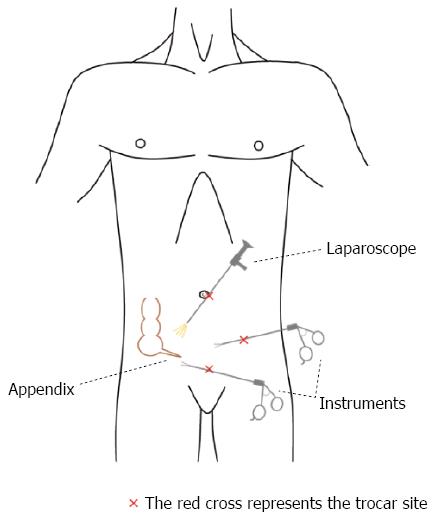
Step 2: Inspect abdominal cavity: The area is inspected to orient the surgeon to the position of the appendix.
Step 3: Expose appendix: The bowel is gently retracted rostrally using atraumatic graspers to allow access to appendix.
Step 4: Locate and separate appendicular artery: The mesoappendix is separated from the body of the appendix, and the mesenteric fat is separated to reveal the appendicular artery. This is best done using the “spreader” action of a dissector.
Step 5: Divide appendix from cecum: Using an endoloop, two loops are placed proximal to the cecum, and a third loop is placed 1-2 cm distally to these. The appendix is then divided between the two proximal and 3rd distal loops using scissors or cautery.
Step 6: Extract appendix: The camera may be withdrawn and the existing 10 mm port used for extraction
Step 8: Irrigate: The abdominal cavity should be irrigated thoroughly with sterile saline and suctioned clean several times. In the event of a rupture, great care should be taken to ensure all pus or other infectious fluids have been removed.
Step 9: Final inspection: The abdominal and pelvic cavities are inspected one final time for any signs of infection, errors, or other potential complications.
Check out these related videos:
LAPAROSCOPIC CHOLECYSTECTOMY BY DR R. K. MISHRA
http://www.worldsurgeryforum.net/2018/02/laparoscopic-cholecystectomy-by-dr-mishra.htmlGROSS ANATOMY AND SEGMENTAL ANATOMY OF LIVER
PRINCIPLES OF BOWEL ANASTOMOSIS WITH VIDEOS
MOST IMPORTANT ANATOMY IN DIAGNOSTIC LAPAROSCOPY
<Don't forget to like or share if you found this useful!>
Milestones in the history of intestinal anastomosis
Intestinal anastomosis has been successfully performed for more than 150 years using a variety of techniques and suture materials. Major milestones in the development of this technique are:
Lembert : Seromuscular suture technique for bowel anastomosis in 1826
Lembert : Seromuscular suture technique for bowel anastomosis in 1826
Kocher : Utilised a two-layer anastomosis. First a continuous all-layer suture using catgut, then an
inverting continuous (or interrupted) seromuscular layer suture using silk
Halsted : Favoured a one layer extramucosal closure, it was felt to cause the least tissue necrosis or
luminal narrowing. This technique has now become widely accepted.
Currently accepted technique for intestinal anastomosis
Of these, the method that has proven successful in most situations and in the hands of most surgeons has been the two-layer anastomosis using interrupted silk sutures for an outer inverted seromuscular layer and a running absorbable suture for a transmural inner layer.
The only appreciable shortcoming of the two-layer technique is that it is somewhat tedious and time-consuming to perform. Recently, several reports have appeared advocating a single-layer continuous anastomosis using monofilament plastic suture.
Single layer continuous extramucosal closure has now become widely accepted.
The only appreciable shortcoming of the two-layer technique is that it is somewhat tedious and time-consuming to perform. Recently, several reports have appeared advocating a single-layer continuous anastomosis using monofilament plastic suture.
Single layer continuous extramucosal closure has now become widely accepted.
A single-layer continuous anastomosis can be constructed in significantly less time and with a similar rate of complications compared with the two-layer technique. It also costs less than any other method and can be incorporated into a surgical training program without a significant increase in complications.
Single Layer , Extramucosal, Interrupted- End to End bowel anastomosis (simulation)

Side to side bowel anastomosis (simulated)

Difference between Extramucosal Technique and Seromuscular Suture Technique
The extramucosal suture must include the submucosa as this has a high collagen content and is the most stable suture layer in all sections of the gastrointestinal tract.
Suture Materials used in Intestinal Anastomosis
Catgut and silk have been replaced by synthetic, usually absorbable, polymers.
The suture materials should be of 2/0–3/0 size and made of an absorbable polymer, which can be braided (e.g. polyglactin), or monofilament (e.g. polydioxanone), mounted on an atraumatic round-bodied needle.
The suture materials should be of 2/0–3/0 size and made of an absorbable polymer, which can be braided (e.g. polyglactin), or monofilament (e.g. polydioxanone), mounted on an atraumatic round-bodied needle.
Suture bites should be approximately 3–5 mm deep and 3–5 mm apart depending on the thickness of
the bowel wall.
Stay sutures are put to avoid the need for tissue forceps. They are important for displaying the bowel
ends and in accurate alignment of the bowel and the placement of the sutures.
In cases of minor size discrepancy, Cheatle split (making a cut into the antimesenteric border) may
help to enlarge the lumen of distal, collapsed bowel and allow an end-to-end anastomosis to be fashioned.
Important Considerations while doing Bowel Anastomosis
In cases of major size discrepancy of size of bowel end to be anastamosed, a side-to-side or end-to-side anastomosis is done.In cases of minor size discrepancy, Cheatle split (making a cut into the antimesenteric border) may
help to enlarge the lumen of distal, collapsed bowel and allow an end-to-end anastomosis to be fashioned.
Bowel edges should be pink and bleeding prior to anastomosis.
References
Bailey and Love's Short Practice of Surgery, 27th Edition: International Student's Edition
Single-Layer Continuous Versus Two-Layer Interrupted Intestinal Anastomosis
References
Bailey and Love's Short Practice of Surgery, 27th Edition: International Student's Edition
Single-Layer Continuous Versus Two-Layer Interrupted Intestinal Anastomosis


